Showing posts with label Side Dish. Show all posts

Sunday, February 9, 2025

Fritzle Fries

William requested that I make these for his birthday, and while the recipe itself seems to contain a mistake, I was able to figure it all out and make something delicious. Enjoy!


Fritzle Fries

Ingredients:

  • 1/4 cup small tapioca pearls
  • 1/4 cup plain yogurt
  • warm water to reach a pipeable consistency (more than 1/4 cup... possibly 1/2-1 cup water)
  • 1/4 cup grated parmesan cheese
  • pinch of cayenne pepper
  • 1/2 cup rice flour
  • oil for frying
  • salt for sprinkling on top of fries when they come out of the oil.

Directions:

  1. In a medium mixing bowl, soak the tapioca in the yogurt and *1/4 cup warm water for about 15 minutes.
  2. Add the parmesan cheese, cayenne, and rice flour, then stir together until just combined. Add enough additional water to make a pipeable dough/batter.
    • The original recipe called for just a 1/4 cup water TOTAL, which did not make any kind of pipeable dough at all. So I had to just keep adding water until it was something similar in texture to other things I have tried to pipe (not too thick, but not runny). In the end, I made my best guess and probably added an additional 1/4 cup or (even 1/2 cup or more) extra water. If I make this again, I will do a better job of measuring and tracking how much water I used.
  3. Transfer to a piping bag fitted with a star or round tip.
    • For my collection of tips, it was my medium size (not my smallest tips, not my huge cupcake tips).
  4. Fill a small sauce pan with enough oil to fry in (about 2 inches deep) over medium heat.
  5. Once oil is hot, pipe lines of batter into oil and fry until golden on all sides. Drain on paper towel lined plate and serve hot. Sprinkle with salt while hot, if desired.
    • The original recipe did not call for sprinkling salt on the end product (like you would for French fries) but after taste-testing, we decided to add the salt because the Friztle Fries were a little bland without it. William doesn't use dipping sauce for his fries and I wanted them to be tasty for him. But with the right dipping sauce, you might not even want to add the salt at the end after frying.

Sunday, November 24, 2024

Marsha's Sweet Potato Casserole

After making my favorite recipe recently, I decided to do a few easy tweaks and make it "Marsha's version." It turned out super good and I want to document it here. It's not much different, but just slightly different than this recipe: https://1brother2sisters.blogspot.com/2019/12/sweet-potato-casserole.html

Marsha's Sweet Potato Casserole

Casserole:

  • 1 large can (approximately 30 oz.) sweet potatoes
  • 1/4 cup brown sugar
  • 1 tsp. vanilla
  • 1/4 cup butter
  • 2 eggs, beaten, room temperature
  • 1/2 tsp. cinnamon
  • pinch of salt

Topping:

  • 1/2 cup flour
  • 1/2 cup oats
  • 1/4 cup brown sugar
  • 1/3 cup butter, cold cut into pieces
  • honey roasted pecan pieces, about a handful
  • pinch of salt
  • mini marshmallows (for topping later in baking)

Directions:

  1. Combine all casserole ingredients and place in a greased square baking dish. 
  2. Mix all topping ingredients together (except marshmallows) with a fork until crumbly and sprinkle on potatoes. (You may find it easiest to mix the flour, oats, brown sugar and salt together first, then cut in the cold butter with your fork, and finally toss in the nuts.)
  3. Bake at 325 degrees for 18 minutes. 
  4. Add marshmallows and cook until brown and melted, about another 15 minutes or until internal temperature of the middle of the casserole reaches 165 degrees.

Marsha's Notes:

These are the pecan pieces and sweet potatoes that I used.


Tuesday, August 1, 2023

Lower Calorie Cottage Cheese Ranch Dip

For a lower calorie alternative for ranch dressing/dip, try this out! Tastes just like ranch and even sets up thicker when stored in the fridge for a bit. Compared to regular ranch, 1 cup of this is about 200 calories and 24 grams of protein. For one cup of regular ranch, you eat over 1000 calories and no protein. Of course, I don't think most people would sit down and eat an entire cup.


Lower Calorie Cottage Cheese Ranch Dip

Ingredients:

  • 1 16 oz container cottage cheese
  • 1 envelop ranch seasoning for dip

Directions:

  1. Blend one container of cottage cheese in your blender with one package of ranch seasoning. 
  2. Blend until smooth and store in the fridge.

Grilled Pineapple (Air Fryer)

Here is a super easy recipe to get some grilled pineapple straight from your air fryer! And if you are lazy, like I was, you can just use one pre-bought container from the store!


 Grilled Pineapple (Air Fryer)

Ingredients:

  • 1 pineapple
  • 1/4 cup brown sugar
  • 2 Tbl melted butter
  • 1 tsp cinnamon

Directions:

  1. Core and slice your pineapple. 
  2. Mix together your brown sugar, butter and cinnamon. 
  3. Then toss your pineapple in the cinnamon mixture. 
  4. Spread out in an even layer in your air fryer/liner. 
  5. Cook at 380 degrees for 12-15 minutes, flipping your pineapple halfway through cooking. Try serving with ice cream!

Marsha's Notes:

You can use one container (about 1 pineapple's worth) of precut fruit from the store instead of cutting up a fresh pineapple, if you want. About this size:


Wednesday, August 24, 2022

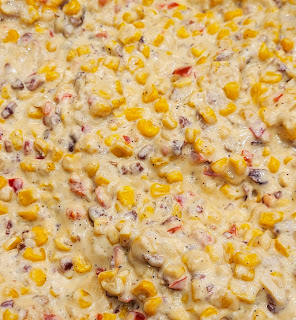
Creamy Confetti Corn with Bacon

Chris has decided that he LOVES this new way to have his favorite veggie... CORN! The original recipe is from Mel's Kitchen Cafe (see here: https://www.melskitchencafe.com/creamy-confetti-corn/) but I tweaked this recipe to suit our family better. Enjoy!

Cream Confetti Corn with Bacon

Ingredients:

  • 1 pkg. pre-cooked bacon strips, chopped
  • 2 packages (12-ounces each) frozen corn kernels, white or yellow
  • ½ cup chopped onion, white, yellow or red
  • ½ cup finely chopped red bell pepper
  • 8-ounce package cream cheese, light or regular, cubed
  • 1-2 tablespoons milk
  • 1 teaspoon sugar
  • ½ teaspoon salt
  • 1 teaspoon pepper
  • A couple handfuls of shredded cheese
Directions:

  1. In a large nonstick skillet, heat a couple tbl of cooking oil.
  2. Add the corn, onion, and red pepper, and cook over medium heat, stirring every so often, until the vegetables are tender and the corn is heated through, 6-8 minutes or whenever things start to brown up in the bottom of the pan. Add the cream cheese and milk, stirring until the cream cheese melts and the mixture is evenly combined.
  3. Stir in the sugar, salt and pepper. Add more salt to taste if needed. I sometimes add a sprinkle of garlic salt over the entire pan.
  4. Top with shredded cheese. Stir to melt and combine. Serve warm.
Note for Krystal:
You can totally leave the onion and pepper out of this recipe and just make a cheesy, creamy corn instead. It just won't be very colorful or "confetti" anymore.

Monday, September 13, 2021

Instant Pot Mac and Cheese

We LOVE this crock pot mac and cheese recipe, but I wanted to see if I could find something equally as yummy for the Instant Pot for those days when you don't have hours to wait on a Crock Pot. The original recipe for this came from here: https://www.melskitchencafe.com/pressure-cooker-mac-and-cheese/

However, we only had good, not great, results (Scott said, "Not as good as the Crock Pot stuff, but still better than Kraft!") but I think there is great potential so I want to document this recipe with my tweaks for next time. I think it all comes down to the type of noodles you use and how long you cook them. By the end of the recommended cooking process with a package of American Beauty elbow macaroni, the noodles were bloated and over cooked with almost all of the liquid in the pot absorbed. I think if I reduced the cook time (pressure-release time) or tried a different noodle brand/shape, we could really come up with something amazing.


Instant Pot Mac and Cheese

Ingredients:

  • 3 ¾ cups water (see note)
  • 2 tablespoons salted butter
  • 1 teaspoon salt
  • 1 pound (454 g) elbow macaroni, about 3 cups
  • 1 cup milk, not skim or evaporated milk
  • ½ cup milk, not skim or evaporated milk
  • 1 teaspoon cornstarch
  • Pinch dry mustard
  • ½ to 1 teaspoon hot sauce, optional but delicious for flavor boost
  • 1 ½ cups (171 g) freshly shredded cheddar cheese (see note)
  • 1 ½ cups (171 g) freshly shredded Monterey Jack cheese

Directions:

  1. Add the water to the insert of a 6-quart electric pressure cooker. Add the butter, salt and macaroni. Stir to even out the noodles.
  2. Pour in the milk. DO NOT STIR.
  3. Set the cook time for 3 minutes. Let the pressure naturally release for 5 minutes and then quick release the remaining pressure. If liquid spurts out of the valve, close it and wait 1-2 minutes and try again. Keep the pressure cooker on the warm/hold setting (don’t hit cancel). Marsha's Note: I just threw a rag over the valve and let the pressure release. It did spurt, but with the rag, it wasn't a huge problem.
  4. Whisk together the sauce ingredients: 1/2 cup milk, cornstarch, dry mustard, and hot sauce. Add the mixture to the cooked noodles, breaking up clumps of noodles as you stir to combine well.
  5. Add the cheese, one handful at a time, and stir until each addition is melted before adding more.
  6. Once all the cheese is melted, season to taste with additional salt, if needed. At this point, you can also drizzle in warm milk, a tablespoon at a time, for extra creamy mac and cheese. Serve immediately.

NOTES FROM MEL'S KITCHEN CAFE
  • Cheese: I like to use medium or sharp cheddar cheese. Note: the sharper the cheddar, the less creamy it will be as it melts. You can sub in other types of cheese, too. White cheddar, havarti, Swiss. This recipe works best if half the cheese is a variety of cheddar and half the cheese is a creamy, good-melting cheese.
  • Adaptation: I adapted this recipe from a skillet recipe using 12 ounces of noodles and 3 cups of cheese. I use 16 ounces for this recipe, but I kept the amount of cheese the same from that original recipe. It’s plenty cheesy for us, but if you want to amp up the cheesiness, increase both types of cheese to 2 cups/8 ounces each.
  • Liquid: The amount of liquid left over in the pot after the noodles have cooked will be variable depending on brand/type of pasta, brand of pressure cooker, how quickly pressure was released, etc. There should be liquid in the bottom of the pot after cooking, but not so much that the noodles are still swimming in it. If there seems to be a ton of extra liquid, drain off all but about 1/2 cup or so.
  • Hot Sauce: the hot sauce may seem unusual; it doesn’t add spiciness. It adds a flavor boost that is super yummy. Just a small drizzle helps, but you can leave it out.

Wednesday, May 12, 2021

Loaded Cauliflower Casserole

We tried this tonight and it's like loaded cheesy potatoes and cauliflower had a baby. So good! If I am not worried about carbs, using potatoes instead would still be my favorite side dish. But if I am trying to lower my carbs, or get my kids to eat/like more veggies, then this is a great place to start. Enjoy!

To see the original recipe, go here: https://www.smalltownwoman.com/loaded-cauliflower-casserole/#tasty-recipes-21653-jump-target


Loaded Cauliflower Casserole

Ingredients:

  • 2 lbs cauliflower florets cut in bite size pieces
  • 1 box (8 ounces) cream cheese softened
  • 1/2 cup sour cream
  • 1 1/2 cups sharp cheddar finely shredded
  • 1 1/2 cups Monterey Jack cheese finely shredded
  • 1 teaspoon garlic powder
  • 1/2 teaspoon onion powder
  • 6 slices crispy cooked bacon coarsely chopped
  • 1/4 cup chopped fresh chives (reserve one tablespoon for the top)
  • Salt and Pepper to taste
Directions:

  1. Steam cauliflower until fork tender; approximately 10 minutes. Drain well in colander.
  2. Preheat oven to 425 degrees. Grease 9 x 13 inch baking dish.
  3. In a large bowl combine cream cheese, sour cream, cheddar cheese, Monterey Jack, garlic powder and onion powder. Mix until creamy and smooth. Gently stir in cauliflower, 1/2 of the bacon and chives. Season with salt and pepper to taste.
  4. Spoon into casserole dish and top with remaining bacon. Bake uncovered for 20-25 minutes or until the cheese is melted. Top with remaining chives and serve.
Notes:
  • The cauliflower should be steamed until it is fork tender.
  • Spray the casserole dish with nonstick spray as it makes for easier clean up.
  • I recommend the full fat sour cream, cream cheese and cheese for this recipe.  It just tastes better with it.
  • Fresh chives really make this casserole pop!  They are worth the added expense and trouble.
  • Season to taste with salt and pepper.  I love lots of pepper on this dish.
Marsha's Notes:
  • I skipped the chives because we were out, and it was fine.
  • I used a bag of mixed cheese blend that we always have on hand, and it was fine.
  • I use the lower-fat cream cheese and it was fine.
  • I added the cauliflower back to the warm pan that I steamed it in, put it back on the warm burner with the heat turned OFF, and then added the cheese mixture so it would warm up, melt a touch, and be easier for me to toss the cauliflower in to get it all mixed well before added to the sprayed dish to bake.
  • I cut my cauliflower into bite-sized pieces. It kinda crumbles but I just scooped up all of the crumbs and bigger pieces and put it all in my pan to steam. It all gets mixed with the cheese anyway, so it didn't matter that some of the pieces were really small. You could also cut the pieces bigger (like florets) if you want that kind of look and texture to the end result. As long as you steam until fork-tender, you can do what you want. 

Wednesday, April 28, 2021

Spaghetti Squash in the Instant Pot

 Cooking spaghetti squash in the Instant Pot is so easy!!! Here is how!


Spaghetti Squash In The Instant Pot

Ingredients:

  • 1 spaghetti squash
  • 1(+) cup of water
  • Optional butter, salt, and pepper

Directions:

  1. Cut your squash into quarters and remove the seeds. 
  2. Place the wire rack/trivet into the bottom of the pot. Add enough water to the bottom of the Instant Pot to cover the bottom and fill without touching the squash when it's placed on the rack. 
  3. Add your squash. 
  4. Seal and cook on high pressure for 7-10 minutes. Quick release the pressure and remove from pot.

Marsha's Notes:

If you are going to be eating the squash plain, then you can add pats of butter on top of each quarter of the squash and season with salt and pepper before cooking. If you are going to but putting other things on your squash, then you can just stick it in the Instant Pot by itself.

Lots of recipes online say to cook the squash on high pressure for 7 minutes, but I found that with my pot I am happier with closer to ten minutes. Just play around with it and see what you like best for texture.

Friday, February 12, 2021

Mexican Rice

Still on the hunt for a restaurant-style Mexican rice, Scott was the most impressed with this version. I think the next time I make it, I will be very careful not to add too much tomato paste or too much lime juice, probably skip the cilantro.... maybe even the cumin and try some taco seasoning instead. Just ideas for next time! But it was still tasty prepared as directed below. For the original recipe, visit here: https://www.melskitchencafe.com/mexican-rice/


Mexican Rice

Ingredients:

  • 1 cup of long grain white rice
  •  2 cups of low-sodium chicken broth
  •  1 tablespoon of olive oil
  •  1 small yellow onion, diced
  •  4 cloves of garlic, finely minced
  •  1/4 cup of tomato paste
  •  1 tablespoon of lime juice, from about 1 lime
  •  1/2 cup of freshly chopped cilantro
  •  2 teaspoons cumin
  •  Salt to taste

Directions:
  1. In a medium-sized pot, add rice and chicken broth. Bring to a boil over high heat. Stir. Cover the pot, lower the heat to low and simmer for 17-20 minutes. Remove from heat and keep the pot covered for 5 more minutes.
  2. While the rice is cooking, heat the olive oil in a large nonstick skillet over medium heat. Cook the onions in the hot oil for 10 minutes, until translucent and starting to brown. Add the garlic to the skillet and cook for one minute, stirring constantly. Stir in the tomato paste and cumin and cook for another minute or two. Mix in hot, cooked rice, lime juice and cilantro. Mix until well combined. Season to taste with salt. Serve immediately.

Instant Pot Refried Beans

So, 2020 was the pandemic and I picked up some dried pinto beans and then never really needed them and dreaded the long prep/soak time for beans. When I saw this recipe for making them in the Instant Pot, I just had to try it! Everyone really liked it, but I did leave out the jalapeno that the original recipe called for. To see the original from Mel's Kitchen Cafe, click here: https://www.melskitchencafe.com/pressure-cooker-refried-beans/


Instant Pot Refried Beans

Ingredients:

  •  1 tablespoon olive oil
  •  1 jalapeño, cored, seeded and finely chopped
  •  1 small onion, chopped (about 1/2 cup)
  •  3-4 cloves garlic, finely minced
  •  1 1/2 pounds dry pinto beans, rinsed
  •  8 cups water
  •  4 cups low-sodium chicken or vegetable broth
  •  2 teaspoons salt
  •  2 tablespoons white vinegar
Directions:
  1. In the insert of an electric pressure cooker, heat the oil (using the Sauté function on the Instant Pot) and add the onion, and garlic, and sauté for 1-2 minutes, stirring often.
  2. Add the rinsed and drained beans, water, broth, salt and vinegar.
  3. Secure the lid on the pressure cooker and cook on high pressure for 35 minutes (electric).
  4. Let the pressure naturally release for 30 minutes. Reserve two cups of the liquid in a separate bowl.
  5. Drain the rest of the liquid off the beans. Using an immersion blender, process/mash to the desired consistency, adding reserved cooking water, if needed for a smoother/softer consistency.
  6. Refrigerate for up to a week or freeze for several months.
Marsha's Notes:
I started the onions with the Sauté function on high  and then turned it down to medium once things started to cook. I also used about a cup of the reserve liquid to remoisten our beans. It probably varies from batch to batch depending on the beans, so just taste-test until they are perfect! I also added a sprinkling of garlic powder to taste but you may not need that depending on how strong your garlic is.

2024- We made these again, and I will note that the 1.5 pounds of beans called for in this recipe makes a LOT of refried beans (probably 4-5 cans worth and that was only a portion of the 4 lb bag of dry beans I bought) so we did use some fresh for dinner, then split the remaining beans into two batches and froze one of them.

This recipe fills our Instant Pot all the way to the max fill line. When venting, things do tend to want to spurt starchy bean water around the kitchen, so maybe cover the valve with a rag before opening. 

Also, a half batch is probably more useable for our family, but I am not sure how that might change the cooking process, so I will return and report if I try it.

Lastly, I found that the beans seems the perfect consistency when hot and fresh with about a cup of the reserved bean water added. However, upon sitting and cooling while we ate dinner, the beans seemed to dry out just a touch, so I added maybe another 1/2 cup or more to the batch before putting it in storage containers.


These were the beans right after I blended them, and they seemed perfect, but I did add more liquid to them after they had cooled a bit before storing because they seemed to have dried out some.

Sunday, January 10, 2021

Instant Pot Lemon Curd

I tried this recipe and it turned out wonderful! Just note, the curd will set and thicken more as it becomes cold in the refrigerator, so don't worry too much if it's not super thick initially.

See the original recipe here: https://www.melskitchencafe.com/easy-instant-pot-lemon-curd/

Instant Pot Lemon Curd

Ingredients:

  •  1/4 cup (2 ounces, 4 tablespoons) butter, melted (I use salted)
  •  1/2 cup (3.75 ounces) granulated sugar
  •  1 large egg
  •  1 large egg yolk
  •  1-2 teaspoons fresh lemon zest
  •  1/2 cup fresh lemon juice (from about 3-4 lemons)

Directions:

  1. Blend all ingredients together in a blender until smooth. Transfer to a heatproof liquid measuring cup or bowl and cover tightly with foil.
  2. Place the trivet inside the Instant Pot or other electric pressure cooker. Add 1 1/2 cups water. Set the covered bowl of lemon curd on the trivet.
  3. Secure the lid, set the valve to seal, and set the Instant Pot to pressure cook on high pressure for 10 minutes.
  4. Let the pressure naturally release for 10 minutes (this is important for the curd to fully set up!), then quick release the remaining pressure.
  5. Carefully remove the bowl from the pot. Remove the foil. It should be set like jello or custard. Whisk until creamy and smooth. (At first it will look curdled, but as you whisk, it will come together.) Optional: strain to remove the lemon zest.
  6. Refrigerate until ready to use (it will thicken as it cools). If it splits or looks curdled after sitting, whisk again to recombine.
Author's Notes:

Double: this recipe can easily be doubled; it doesn't expand much while cooking so as long as the heatproof bowl fits in the Instant Pot, it should work. Update: I'd recommend adding 2-3 minutes to the cooking time for a doubled batch.

Thicker Curd: this homemade lemon curd will likely be a bit thinner than storebought brands you are used to (especially since many of them contain thickeners like gelatin and cornstarch), but it will definitely thicken up as it cools in the refrigerator. For thicker curd you can also decrease the lemon juice to 3/4 cup.

Other Flavors: this recipe converts well to lime curd. I haven't tried it with other citrus fruits like orange or grapefruit, but I'm guessing it will work just fine.

Devonshire Cream

Devonshire cream, otherwise known as clotted cream, is a mild, buttery thickened cream, popular to spread on all kinds of baked bread goodness. More common in the UK than the US, you can easily make your own to enjoy with a hot beverage early in the morning. And it's so easy, made with one simple ingredient!

Devonshire/Clotted Cream

Ingredients:

  • 1 quart heavy cream (NOT ultrapasteurized)

Directions:

  1. Preheat oven to it's lowest setting (typically around 170 degrees). 
  2. Pour the cream into a glass square baking dish (8x8 or so). The cream should be close to 2 inches deep. 
  3. Place the pan, uncovered, into the oven and bake for 10-12 hours. Cream is done after baking almost all day for the cream to begin to thicken. Exact timing depends on how dark you like your end top crust to be. 
  4. Remove from oven and let cool to room temperature. 
  5. Cover with cling film and place in the refrigerator overnight. 
  6. The next morning, use a spoon to "peel up" the top crust and drain the liquid underneath (about 1 1/2 cups fluid). Save the fluid, if desired, to use for biscuits, pancakes, waffles, etc. 
  7. Scoop the remaining thickened cream into a container for storage and keep in the refrigerator, stirring the crusty top bits into the entire mixture. Those bits will soften as they sit in the finished cream and lend flavor.

A friend noted in her recipe, the Devonshire way to enjoy the cream on a biscuit is to do jam first, cream second. The Cornish way is cream then jam. Just a fun tidbit.

Marsha's Notes:

It is important to use NON-ultrapasteurized heavy cream for this recipe to get the right result. Also, the amount that you let the top brown will change the taste of the cream in the end. The more it browns, the stronger the flavor.

Never tried clotted cream? What to expect: It's a bit like a super mild tasting butter, so don't expect too much sweetness or too much flavor. I especially enjoyed the balance the mild cream added to the tang of some lemon curd I added to my biscuit.

Images of steps:

Cream in the pan in the oven.

After several hours of slow baking.

End result.

Peeling back the crust to drain the liquid underneath.

Scooped off solids that are the end result Devonshire cream.

The cream is under the lemon curd on this English muffin, topped with a dusting of powdered sugar.

Monday, May 11, 2020

Homemade Adobo Seasoning

The next recipe I am going to post calls for Adobo Seasoning (the recipe is Old Fashioned Goulash), which I couldn't find in our grocery store (not sure if you can find it anywhere, really...) so I found this recipe to make my own. Enjoy!


Adobo Seasoning

Ingredients:
  • 2 tablespoons salt
  • 1 tablespoon paprika
  • 2 teaspoons ground black pepper
  • 1 1/2 teaspoons onion powder
  • 1 1/2 teaspoons dried oregano
  • 1 1/2 teaspoons ground cumin
  • 1 teaspoon garlic powder
  • 1 teaspoon chili powder
Directions:
  1. In a bowl, stir together the salt, paprika, black pepper, onion powder, oregano, cumin, garlic powder, and chili powder. 
  2. Store in a sealed jar in a cool, dry place.

Saturday, February 22, 2020

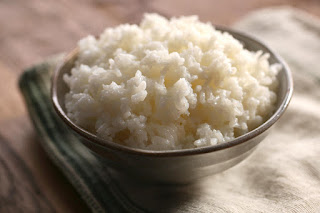
White Rice in the Instant Pot


Making some delicious rice, super easy, and with great texture in the Instant Pot is a snap! No fuss. Just great rice that you can then use for anything you want. Here's how I do it.

Instant Pot White Rice
Ingredients:
  • 3 cups white rice
  • 5 cups chicken broth (three 14.5 oz cans)
Directions:
  1. Place these ingredients in your Instant Pot and use the "rice function" to cook (basically high pressure for 12 minutes). 
  2. Quick release the pressure and you are good to go.
Marsha's Notes:
Now, there is a lot of debate on the Internet about the perfect way to cook rice and it all depends on how you like it. Many people recommend the 1-to-1 ratio of water to rice in a pressure cooker. So if using my ratios is coming out to wet or to sticky for your tastes (I like sticky rice), then drop the water closer to the 1-to-1 ratio. Cook times can vary depending on the type of rice being cooked as well. Many also recommend rinsing the rice beforehand to remove powder, debris and have better flavor.

Thursday, February 20, 2020

Crock Pot Mac and Cheese

We tried this recipe and we loved it. Chris said it was just like deli mac and cheese!


Six Sister's Slow Cooker Mac and Cheese
Ingredients:
  • 2 cups uncooked elbow macaroni
  • 4 tablespoons butter
  • 2 1/2 cups grated sharp cheddar cheese
  • 1/2 cup sour cream
  • 1 (10.5 oz) can condensed cheddar cheese soup
  • 1/2 teaspoon salt
  • 1 cup milk (I used 1%)
  • 1/2 teaspoon dry mustard
  • 1/2 teaspoon black pepper
Directions:
  1. Boil the macaroni in water for six minutes and drain.
  2. In a medium saucepan, mix butter and cheese. Heat over medium high heat and stir until the cheese melts.
  3. Spray your slow cooker with non-stick cooking spray. Combine cheese mixture, sour cream, soup, salt, milk, mustard and pepper in your slow cooker. Add the drained macaroni and stir again.
  4. Cook on low for 2 to 2 1/2 hours, stirring occasionally (I cooked mine for about 2 hours and stirred it twice and it was perfect).
Marsha's Notes:
On the Six Sister's page they posted this note about how the cheese and butter will melt into a clump in the saucepan, but that's okay. Just follow the instructions and it will turn into wonderful, creamy mac and cheese after you add it to the slow cooker, let it cook some, and then give it a few stirs during the cooking process. 

Monday, February 17, 2020

Candied Yams

I found this recipe years ago and am now copying it here from our family cookbook binder. Enjoy!


Candied Yams
Ingredients:
  • Precook 3 large yams until quite done
  • 1 cup brown sugar
  • ½ cup flour
  • 2 cups milk
  • 2 Tbl butter
  • 1 Tbl vanilla
Directions:
  1. Mix sugar, flour and milk together.  
  2. Cook on low heat stirring constantly until bubbly and thickened.  
  3. Add butter and vanilla.  
  4. Slice precooked yams in baking dish, pour sauce over top.  
  5. Cook 350 degrees for 20 minutes.  
  6. Cover with marshmallows and brown under broiler, watch closely so not to burn.

Corn Casserole

I found this recipe years ago and am now copying it here from our family cookbook binder. Enjoy!


Corn Casserole
Ingredients:
  • 1 can corn, drained
  • 1 can cream style corn
  • 1 (8 oz.) pkg. corn muffin mix, Jiffy
  • 1 cup sour cream
  • 1/2 cup butter, melted
  • 1-1 1/2 cups shredded cheddar
Directions:
  1. Preheat oven to 350 degrees.  
  2. In a large bowl, stir together the 2 cans of corn, corn muffin mix, sour cream, and melted butter. 
  3. Pour into a greased 9x9 pan. 
  4. Bake for 45 minutes, or until golden brown.  
  5. Remove from oven and top with cheddar.  Return to oven for 5-10 minutes, or until cheese is melted.  
  6. Let stand for 5 minutes and then serve warm.
Marsha's Notes:
Make sure you cook for about as long as the recipe suggests. We have tried cooking it less because the casserole SEEMED to be done and the middle was just a touch under done. So for our oven, I would do at least 40 minutes, if not the entire 45 minutes if possible.

Out of the oven, ready to be topped with cheese.


Out of the broiler with the cheese melted.


BBQ Potatoes

I found this recipe years ago and am now copying it here from our family cookbook binder. Enjoy!


BBQ Potatoes
Ingredients:
  • 4 medium red potatoes, cut into cubes
  • 1 Tbl. oil
  • 2 Tbl barbecue dry seasoning
  • 1 large onion, cut up (opt)
Directions:
  1. Toss potatoes with oil in large bowl. Add seasoning, toss to coat evenly.  
  2. Place potatoes on large, wide sheet of heavy duty aluminum foil sprayed with non-stick spray.  Place onions evenly on top of potatoes.  Bring up foil sides; double fold top and ends to tightly seal packet.  
  3. Bake at 400-425 degrees for 45-60 minutes, or until potatoes are tender, turning halfway through cooking time.  
Marsha's Notes:
You can also mix things up by adding cheese and Mrs. Dash garlic and herb seasoning instead of the barbecue.

Zucchini Sweet Pickles

I found this recipe years ago and am now copying it here from our family cookbook binder. Enjoy!


Zucchini Sweet Pickles

Day One:
1 heaping gallon of zucchini, peeled and seeded and cut into bite sized pieces 4 qts. heaping. 
1 gallon cold water
1 Tbl. calcium hydroxide (get at drug store) or slaked lime.

Mix all together.  Soak 24 hours in lime solution, stirring occasionally, to firm up squash.  Must use lime or it will be mushy. 

Day Two:
Drain, rinse, and let soak in plain ice water for 3 hours.  Drain and make syrup:
6 cups vinegar    
12 cups sugar
2 tsp. salt
2 tsp mixed pickled spices               

Pour over zucchini and let set for 24 hours, stirring occasionally. 

Day Three:
Bring everything to a boil in open kettle.  Boil until clear- from 45 minutes to an hour.  Seal in hot jars.  I put into a boiling water bath for 10 minutes to help seal.

Layered Christmas Salad

I found this recipe years ago and am now copying it here from our family cookbook binder. Enjoy!


Layered Christmas Salad
Ingredients:
  • 20 lg. marshmallows
  • Water
  • Lemon Jell-o (3oz.)
  • Strawberry Jell-o(3oz.)
  • Lime Jello (3 oz)
  • 8 oz cream cheese
  • 1 pkg whipped cream
Directions:
  1. Make strawberry jell-o by package directions.  Let chill until set up.  
  2. Melt marshmallows with 2 Tbl. water.  Dissolve lemon Jell-o in ¾ cup boiling water.  Add melted marshmallows and stir well.  Add cream cheese and blend well.  Fold in whipping cream.  Spread this over the red Jell-o and chill.  
  3. Make lime Jell-o by package directions and pour over chilled cream cheese layer.  Chill until set.  
  4. Serve.